Thursday 29 December 2011

The crunch and the crumb

It happened quite casually several weeks ago, cycling. A week passed before I realized I had broken a rib. It turns out that ribs are quite fragile and tend to break rather easy. It was around that same time the Momofuku milk bar cookbook arrived in the post, now responsible for my latest addiction. I cannot get enough of the crunch nor the crumb; as the cracking sound of a crunch echoes my aching rib cage it is simultaneously sending frequency waves of pleasure to the rest of me.

I’ve already gone through and made 3 crumbs and 1 crunch featured in the book just this past week so this must be an addiction. crunch. crumb. crumble.

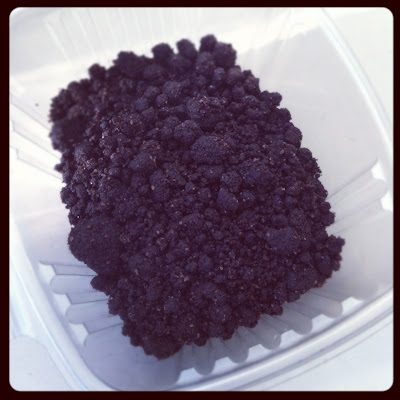
They’re the easiest thing to make, not only in the book, but in the history of ever; they take 2 minutes to mix together and lay on a tray but the result triggers immeasurable pleasure and the smell in the kitchen is criminal.

They go on and in everything from ice cream, cakes and cookies, with pudding, sprinkled on yogurt or simply scoffed down by the bowlful. They'll last about a month if kept in an airtight container in the fridge/ freezer, so you can make plenty in advance and be ready for whatever life throws at you.

I have a sneaky suspicion these will go wonderfully well sprinkled over a buttered slice of bread, a la hagelslag.

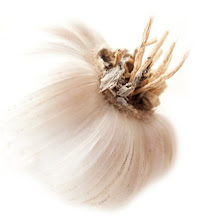
It’s the crunch in any dish that adds an element of oomph, that je ne sais quoi quality, a crumbling joy, a crunchy excitement and a crispy pleasure in one mouthful, loud and noisy. The chocolate, milk and birthday crumbs as well as the cereal crunch all share the same highly addictive nature, sweet, salty and crunchy like that. They tap to our primary snacking pleasure gland, the achilles heal of snackers unite, with crumbs thats echo a buttery cake crust (aka the best part of the cake) and crunchy treats that elevate and celebrate the munching of cereals straight from the box.

Here is a link for the chocolate crumb and chocolate crumb cookie Recipes,

here is one for the milk crumbs and

one for the cornflake crunch.

For an older post on Momofuku milk bar's compost cookie click here.

To healed ribs and a crunchy 2012.

Sunday 18 December 2011

Calas and an antitheists Hanukkah


I first heard of Christopher Hitchens when he died. Then I spent the better part of a saturday afternoon watching, listening and reading his lectures and interviews and articles.

Coincidentally with this time of year, Hitchens wrote a fascinating piece on Hanukkah in 2007, offering his alternative interpretation to the supposed victory of light over darkness and, reasonably and rather convincingly, claiming it a the victory of faith over knowledge and free thought and in so, the victory is of darkness over light.

As a firm believer in alternatives myself, I’ve attached a link to the piece here. Its an interesting read if you have a few minutes to spare, are open minded, inquisitive, value free thinking and the importance of asking questions about the world around us even if you think we hold all the answers already. It does not, however, offer a reading as to why we eat fried dough this time of year, every year.

In the spirit of offering alternatives at this particular sizzling season I made traditional Calas, a New Orleans breakfast specialty that is golden brown rice fritters just this side of sweet. Best served warm and freshly fried, the steaming fritters release a festive aroma complimented with a bite- an alternative option to the traditional latkes and doughnuts (and apparently works great with rice leftover from dinner).

Happy holidays, one way or the other.

Calas

Lightly adapted from Marion Cunnungham’s ‘The breakfast book

Approx. 15 calas

Ingredients

¾ cup water

¼ cup long grain rice like Basmati, Perisan and Jasmine.

½ tsp salt

¼ cup lukewarm water

10g fresh yeast (or 3g active dry yeast)

1 large fresh egg

2½ Tbs sugar

½ tsp lemon zest

½ tsp freshly grated nutmeg

¾ cup all purpose flour

oil, for frying

Serve with: confectioner’s sugar

  1. A day earlier: In a medium saucepan boil¾ cup water. Add the rice and salt, reduce to a low flame, cover and cook for 25 minutes (longer then you would do making rice. The rice should melt to a lumpy paste). Strain any remaining water and use a fork to mash the rice.
  2. In a small bowl, pour the¼ cup lukewarm water and add the yeast. Stir well and set aside for 5 minutes, until the yeast has fully dissolved in the water.
  3. Add the yeast mixture to the mashed rice, cover with plastic wrap and set aside overnight.
  4. The next day: in a bowl, beat the egg. Add the sugar, lemon zest, grated nutmeg and ½ cup flour and beat until combined.
  5. Add the yeasted rice to the mixture and mix well for 2 minutes.
  6. Add the remaining 1q4 cup flour and mix well. Taste and add salt, if needed. Cover and let proof at room temperature for 30 minutes.
  7. In a large sauté pan pour oil to about 3-4 cm deep. once hot (but not smoking!) carefully drop batter in heaping tablespoons into the oil, 2-3 at a time. Fry the Calas until golden, about 1 minute for each side. Make sure the oil isn’t too hot as the calas would overfry on the outside and remain raw inside.
  8. Using a slotted spoon, remove the Calas from the hot oil to a paper towel.
  9. Serve warm, sprinkled with confectioner’s sugar.

Tuesday 6 December 2011

Food photography / photography Food


Newton’s law of motion states that every action is an equal and opposite reaction, and if that’s so, it only makes sense that just as Food can be captured through photography, photographic equipment should somehow be made edible. It’s a fine line that separates cookies from existential philosophy and I think I just crossed it.

Sometimes inspiration lies in the most unexpected of places. Cookie cutters, for example. These digital SLR, range finder and Rolleiflex camera cookie cutters (available from this site) were the inspiration for a long overdue homage to the tool that has been my lens to the world and a source of focus and perspective ever since my father handed me a Praktica on my 10th birthday (which sadly met its demise about 10 years ago on a trip to Barcelona, after sharing space with a bottle of red currant juice that wasn’t screwed properly in my bag).

This is a sweet and baked homage, basic yet powerful, and, true to the early days of photography, it is in black and white.

Chocolate Sugar Cookies with White chocolate filling

I slightly adapted this recipe to bake approx 15 sandwich cookies


Ingredients

1 1/3 cups (175 grams) all purpose flour

3½ Tbs unsweetened Dutch processed cocoa powder

½ tsp ground cinnamon

¼ teaspoon salt

½ teaspoon (4 grams) baking powder

110 grams unsalted butter, room temperature

3/4 cup granulated white sugar

1 large egg

1-2 drops almond extract

100g white chocolate

  1. In a large bowl, whisk together the flour, cocoa powder, cinnamon, salt, and baking powder.
  2. In a separate bowl, either that of an electric mixer or using a hand mixer, cream the butter and sugar until light and fluffy, about 3 to 4 minutes.
  3. Add the egg and beat well. Add the almond extract and beat until combined.
  4. Gradually add the flour mixture and beat until you have a smooth dough.
  5. Shape into 2 discs, cover with plastic wrap, and refrigerate for at least 1 hour or until firm enough to roll.
  6. Preheat oven to 175C (350F) and line two baking sheets with parchment paper.
  7. Remove one half of the chilled dough from the refrigerator and, on a lightly floured surface, roll out the dough to a thickness of 5mm.
  8. Lightly flour the cookie cutter and cut out desired shapes. Transfer cookies to the prepared baking sheet.
  9. Place the baking sheets with the unbaked cookies in the refrigerator for 10 to 15 minutes to chill the dough, which will prevent the cookies from spreading and losing their shape while baking.
  10. Bake until lightly golden, about 10 minutes but do not allow to brown. Transfer to wire racks to cool.
  11. Repeat steps 7-10 with the remaining dough.
  12. When ready to assemble the cookies, place the chocolate in a double boiler until melted melt.
  13. Spread about 1/2 teaspoon of melted chocolate on the centre of one cookie and top with another. Repeat with the remaining cookies and allow to cool and the chocolate set.
  14. To draw the contour of the cameras in chocolate I used this handy little thing (I like to go low tech).

The cookies will keep for several days in an airtight container.

Sugar cookies with dark chocolate filling

I slightly adapted this recipe to bake approx 15 sandwich cookies


Ingredients

2 cups all-purpose flour

1/4 tsp salt

1/2 tsp baking powder

110g unsalted butter

1 cup sugar

1 large egg, lightly beaten

2 Tbs milk

1/2 tsp pure vanilla extract

100g dark chocolate (min. 70% cocoa solids)


  1. In a bowl, whisk together flour, salt, and baking powder.
  2. In a separate bowl, either that of an electric mixer or using a hand mixer, cream the butter and sugar until light and fluffy.
  3. With mixer running, add the egg, milk, and vanilla and mix until well combined.
  4. With the mixer on low, slowly add the flour mixture and mix until just combined.
  5. Shape into 2 discs, cover with plastic wrap, and refrigerate for at least 1 hour or until firm enough to roll.
  6. Preheat oven to 175C (35F) and line two baking sheets parchment paper.
  7. On a lightly floured work surface, roll out dough to 5mm thickness.
  8. Remove one half of the chilled dough from the refrigerator and, on a lightly floured surface, roll out the dough to a thickness of 5mm.
  9. Lightly flour the cookie cutter and cut out desired shapes. Transfer cookies to the prepared baking sheet.
  10. Place the baking sheets with the unbaked cookies in the refrigerator for 10 to 15 minutes to chill the dough, which will prevent the cookies from spreading and losing their shape while baking.
  11. Bake until lightly golden, about 10 minutes but do not allow to brown. Transfer to wire racks to cool.
  12. Repeat steps 8-11 with the remaining dough.
  13. When ready to assemble the cookies, place the chocolate in a double boiler until melted melt.
  14. Spread about 1/2 teaspoon of melted chocolate on the centre of one cookie and top with another. Repeat with the remaining cookies and allow to cool and the chocolate set.
  15. To draw the contour of the cameras in chocolate I used this handy little thing (I like to go low tech).

The cookies will keep for several days in an airtight container.