Showing posts with label chocolate. Show all posts

Thursday, 29 December 2011

The crunch and the crumb

It happened quite casually several weeks ago, cycling. A week passed before I realized I had broken a rib. It turns out that ribs are quite fragile and tend to break rather easy. It was around that same time the Momofuku milk bar cookbook arrived in the post, now responsible for my latest addiction. I cannot get enough of the crunch nor the crumb; as the cracking sound of a crunch echoes my aching rib cage it is simultaneously sending frequency waves of pleasure to the rest of me.

I’ve already gone through and made 3 crumbs and 1 crunch featured in the book just this past week so this must be an addiction. crunch. crumb. crumble.

They’re the easiest thing to make, not only in the book, but in the history of ever; they take 2 minutes to mix together and lay on a tray but the result triggers immeasurable pleasure and the smell in the kitchen is criminal.

They go on and in everything from ice cream, cakes and cookies, with pudding, sprinkled on yogurt or simply scoffed down by the bowlful. They'll last about a month if kept in an airtight container in the fridge/ freezer, so you can make plenty in advance and be ready for whatever life throws at you.

I have a sneaky suspicion these will go wonderfully well sprinkled over a buttered slice of bread, a la hagelslag.
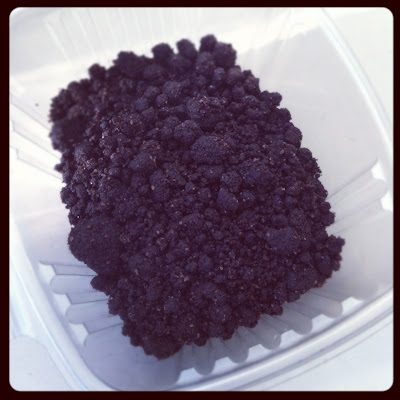
It’s the crunch in any dish that adds an element of oomph, that je ne sais quoi quality, a crumbling joy, a crunchy excitement and a crispy pleasure in one mouthful, loud and noisy. The chocolate, milk and birthday crumbs as well as the cereal crunch all share the same highly addictive nature, sweet, salty and crunchy like that. They tap to our primary snacking pleasure gland, the achilles heal of snackers unite, with crumbs thats echo a buttery cake crust (aka the best part of the cake) and crunchy treats that elevate and celebrate the munching of cereals straight from the box.

Here is a link for the chocolate crumb and chocolate crumb cookie Recipes,

here is one for the milk crumbs and

one for the cornflake crunch.

For an older post on Momofuku milk bar's compost cookie click here.

To healed ribs and a crunchy 2012.

Tuesday, 6 December 2011

Food photography / photography Food


Newton’s law of motion states that every action is an equal and opposite reaction, and if that’s so, it only makes sense that just as Food can be captured through photography, photographic equipment should somehow be made edible. It’s a fine line that separates cookies from existential philosophy and I think I just crossed it.

Sometimes inspiration lies in the most unexpected of places. Cookie cutters, for example. These digital SLR, range finder and Rolleiflex camera cookie cutters (available from this site) were the inspiration for a long overdue homage to the tool that has been my lens to the world and a source of focus and perspective ever since my father handed me a Praktica on my 10th birthday (which sadly met its demise about 10 years ago on a trip to Barcelona, after sharing space with a bottle of red currant juice that wasn’t screwed properly in my bag).

This is a sweet and baked homage, basic yet powerful, and, true to the early days of photography, it is in black and white.

Chocolate Sugar Cookies with White chocolate filling

I slightly adapted this recipe to bake approx 15 sandwich cookies


Ingredients

1 1/3 cups (175 grams) all purpose flour

3½ Tbs unsweetened Dutch processed cocoa powder

½ tsp ground cinnamon

¼ teaspoon salt

½ teaspoon (4 grams) baking powder

110 grams unsalted butter, room temperature

3/4 cup granulated white sugar

1 large egg

1-2 drops almond extract

100g white chocolate

  1. In a large bowl, whisk together the flour, cocoa powder, cinnamon, salt, and baking powder.
  2. In a separate bowl, either that of an electric mixer or using a hand mixer, cream the butter and sugar until light and fluffy, about 3 to 4 minutes.
  3. Add the egg and beat well. Add the almond extract and beat until combined.
  4. Gradually add the flour mixture and beat until you have a smooth dough.
  5. Shape into 2 discs, cover with plastic wrap, and refrigerate for at least 1 hour or until firm enough to roll.
  6. Preheat oven to 175C (350F) and line two baking sheets with parchment paper.
  7. Remove one half of the chilled dough from the refrigerator and, on a lightly floured surface, roll out the dough to a thickness of 5mm.
  8. Lightly flour the cookie cutter and cut out desired shapes. Transfer cookies to the prepared baking sheet.
  9. Place the baking sheets with the unbaked cookies in the refrigerator for 10 to 15 minutes to chill the dough, which will prevent the cookies from spreading and losing their shape while baking.
  10. Bake until lightly golden, about 10 minutes but do not allow to brown. Transfer to wire racks to cool.
  11. Repeat steps 7-10 with the remaining dough.
  12. When ready to assemble the cookies, place the chocolate in a double boiler until melted melt.
  13. Spread about 1/2 teaspoon of melted chocolate on the centre of one cookie and top with another. Repeat with the remaining cookies and allow to cool and the chocolate set.
  14. To draw the contour of the cameras in chocolate I used this handy little thing (I like to go low tech).

The cookies will keep for several days in an airtight container.

Sugar cookies with dark chocolate filling

I slightly adapted this recipe to bake approx 15 sandwich cookies


Ingredients

2 cups all-purpose flour

1/4 tsp salt

1/2 tsp baking powder

110g unsalted butter

1 cup sugar

1 large egg, lightly beaten

2 Tbs milk

1/2 tsp pure vanilla extract

100g dark chocolate (min. 70% cocoa solids)


  1. In a bowl, whisk together flour, salt, and baking powder.
  2. In a separate bowl, either that of an electric mixer or using a hand mixer, cream the butter and sugar until light and fluffy.
  3. With mixer running, add the egg, milk, and vanilla and mix until well combined.
  4. With the mixer on low, slowly add the flour mixture and mix until just combined.
  5. Shape into 2 discs, cover with plastic wrap, and refrigerate for at least 1 hour or until firm enough to roll.
  6. Preheat oven to 175C (35F) and line two baking sheets parchment paper.
  7. On a lightly floured work surface, roll out dough to 5mm thickness.
  8. Remove one half of the chilled dough from the refrigerator and, on a lightly floured surface, roll out the dough to a thickness of 5mm.
  9. Lightly flour the cookie cutter and cut out desired shapes. Transfer cookies to the prepared baking sheet.
  10. Place the baking sheets with the unbaked cookies in the refrigerator for 10 to 15 minutes to chill the dough, which will prevent the cookies from spreading and losing their shape while baking.
  11. Bake until lightly golden, about 10 minutes but do not allow to brown. Transfer to wire racks to cool.
  12. Repeat steps 8-11 with the remaining dough.
  13. When ready to assemble the cookies, place the chocolate in a double boiler until melted melt.
  14. Spread about 1/2 teaspoon of melted chocolate on the centre of one cookie and top with another. Repeat with the remaining cookies and allow to cool and the chocolate set.
  15. To draw the contour of the cameras in chocolate I used this handy little thing (I like to go low tech).

The cookies will keep for several days in an airtight container.

Sunday, 7 November 2010

pomegranate Cranachan

I was recently introduced to the Scottish Cranachan. I stumbled upon it right around the same time I spent a family vacation at the Scott’s hotel in Tiberias. I felt I could not and should not ignore the evidently recurring theme.

Tiberias is a small city overlooking the sea of Galilee, and really that is its main feature. That and the Scott’s Hotel, perfectly designed so that there is no need to venture outside to the dreary surrounding, while enjoying a panoramic view, though in the case you do, you can get it in small doses, in the form of a tour and a guide.

Between the pool, the spa and the dining room, a room with a view and a whiskey bar, it was the closet to a vacation in Scotland without the need for a passport.

Cranachan, as I found out, is a Scottish dessert served during the harvest season, mainly summer and fall. It consists of the best in Scottish produce: dairy, oats, berries, honey and single malt whiskey. Scotland is still on my ‘go to’ places, but I have never been drawn to the cuisine with stories on deep fried everything and stuffed innards. I was more then pleasantly surprises to discover cranachan and how it spoke in a dialect I could relate to and understand.

This is no Scotland and so I took the original recipe and modified it using local and seasonal ingredients to a cranachan with a Hebrew accent. Similar to the Japanese version of tahini, it is always a pleasant surprise to find that some words mean the same thing no matter the language. This is one of those dishes.

pomegranate Cranachan

(serves 6)

Recipe heavily adapted from here


Ingredients

170g coarsely grated dark chocolate (min 70% cocoa solids)

1 cup hazelnuts, toasted, husked, coarsely chopped

1tsp cinnamon

1/3 cup brown sugar

1 cup old-fashioned rolled oats (not the instant kind)

1 3/4 cups chilled heavy whipping cream

1/3 cup sour cream

1/3 cup Arrack (or single malt whiskey)

3 tablespoons pomegranate molasses

1 pomegranate, seeded.

Preheat oven to 175°C.

Mix chocolate, hazelnuts, cinnamon and brown sugar in medium bowl.

Spread oats out on rimmed baking sheet and bake for about 7 minutes, until toasted and golden brown, stirring occasionally.

Stir hot oats into chocolate mixture. The hot oats will partially melt chocolate.

Set-aside until chocolate firms, at least 2 hours. This can be made 1 day ahead, covered and chilled.

Beat whipping cream until it reaches the stiff peaks stage.

Gently fold the sour cream, and Arrack into the whipped cream.

Fold the pomegranate molasses and gently fold to create red swirls in the whiteness of the cream.

Either in individual bowls or one large communal bowl layer 3/4 cup cream mixture and 3/4 cup oat mixture and repeat layering.

Top with the cream mixture and sprinkle with oat mixture and pomegranate seeds.

Can be served at once or prepared in advance and chilled for a few hours.

If you cant get hold of pomegranates or pomegranate molasses, you can substitute it with any honey and seasonal or preserved fruit you have.

Saturday, 21 August 2010

Compost Cookie


Crunch. The word alone has a satisfying texture.

I have infinite love and appreciation for the crunch. No dish is complete without it, be it the floating croutons in a hearty soup, a sprinkle of crunch on top of salad or covering whatever dessert is with speckled of crunchy granules. Sweet on top of savory or vise versa, the crunch is like an exclamation mark at the end of a sentence.

Morning cereal is not about sugar intake. Its about the crunch. How can anyone sleep with all the noise and havoc munching away?

A quick look in my pantry I realize the wide selection of crunch enhancing foodstuff, from crushed toasted pecans, caramelized chickpeas and coriander seeds (these would be mind blowing on ice cream as well as salad), to homemade Graham nuts (an old Amish recipe) and several crumble toppings in the freezer.

It’s addictive and comforting, sensual and satisfying, it is the X factor, the oomph and the pazzaz. It deserves a celebration. It could think of an entire workshop dedicated to the crunch, its history, various forms, production methods, local & seasonal variations... in the meantime I keep hearing and reading about Momofuku’s milk bar, and its famous compost cookies. Any cookie that contains both sweet and savoury “has me at Hello”. What’s more, they’re basically all about various crunch-es stuck together with some cookie dough. I managed to track down the recipe and it did not disappoint.

The batter contains a bit of this and a bit of that, as the name suggests; compost, with dark chocolate chips, roasted coffee beans, salted pretzels, potato chips chopped peanuts and rolled oats (these more chewy then crunchy). This may sound random and over the top but in reality it all comes together nicely and it works. The contents spread evenly in the batter so every bite is different and unique with a balance of sweet and savoury, crunchy and chewy, coffee and pretzels, peanuts and chocolate.

Isn’t this all one ever wants of a cookie???

Momofuku Milk Bar’s Compost Cookie


By Christina Tosi

Slightly modified from this recipe


Ingredients

1 cup Butter

1 cup Sugar

3/4 cup Light Brown Sugar

1 Tbsp golden Syrup

1 tsp Vanilla Extract

2 Large Eggs

1 3/4 cups all purpose Flour

2 tsp Baking Powder

1 tsp Baking Soda

2 tsp Kosher Salt

1 1/2 cups a mixture of dark chocolate chips, coffee beans, rolled oats

1 1/2 cups potato chips, pretzels, and roasted peanuts, chopped.

cream butter, sugars and golden syrup on medium high for 2-3 minutes until fluffy and pale yellow in colour. You can do this in a stand mixer with the paddle attachment, or with a hand mixer.

Scrape down the sides of the mixing bowl with a spatula.

On a lower speed, add eggs and vanilla to incorporate. Increase mixing speed to medium-high and start a timer for 10 minutes. During this time the sugar granules will fully dissolve, the mixture will become an almost pale white colour and your creamed mixture will double in size.

When time is up, on a lower speed, add the flour, baking powder, baking soda, and salt. Mix 45-60 sec just until your dough comes together and all remnants of dry ingredients have incorporated. Do not walk away from your mixer during this time or you will risk over mixing the dough. Scrape down the sides of the mixing bowl with a spatula.

On same low speed, add in the chcolate, coffee and rolled oats and mix for 30-45 sec until they evenly mix into the dough. Add in the snack foods last, paddling again on low speed until they are just incorporated.

Using an ice cream scoop, portion cookie dough onto a tray lined with parchment paper, a minimum of 10cm apart in any direction.

You can also arrange them in a container and keep in the fridge up to a week. they can also be kept in the freezer, ready to pop in the oven whenever you crave them.

Wrap scooped cookie dough tightly with plastic wrap and refrigerate for a minimum of 1 hour.

DO NOT BAKE your cookies from room temperature or they will not hold their shape.

Preheat the oven to 175°C.

Bake 9-11 min. While in the oven, the cookies will puff, crackle and spread.

At 9 min the cookies should be browned on the edges and just beginning to brown towards the centre. Leave the cookies in the oven for the additional minutes if these colours don't match up and your cookies stills seem pale and doughy on the surface.

Cool the cookies completely on the sheet pan before transferring to a plate or an airtight container or tin for storage.

At room temp, cookies will keep fresh 5 days. In the freezer, cookies will keep fresh 1 month.

Saturday, 26 June 2010

Chocolate Praline crunchy bites

It starts by making Nutella from scratch. It ends with matcha green tea lightly sprinkled above, mainly for a colour contrast. This is the ultimate dark chocolate hit with a sufficient crunch and just the right amount of roasted bitterness, coated with a smooth chocolate ganache. Its pure and its evil and far too simple to make, considering the instant gratification. Using the finest ingredients is a must. No shortcuts here. Or ever. Really. When I come to think about it.

The recipe calls for praline powder. This can usually be found in specialty shops, or it can be made at home from scratch using hazelnuts, cashews, peanuts or almonds. Here is a recipe. The general idea is roasting the nuts, caramelizing them and grinding to a fine powder.

Chocolate praline crunchy bites

(recipe adapted from here)

Makes about 40 bites

Ingredients

Chocolate praline

125g praline powder

125g dark chocolate (min 70% cocoa solids), chips, or coarsely chopped

chocolate crunch

65g dark chocolate (min 70% cocoa solids), chips, or coarsely chopped

30g unsalted butter

125g plain cornflakes, crushed

chocolate coating

150 ml cream

30g unsalted butter

200g dark chocolate (min 70% cocoa solids), chips, or coarsely chopped

cocoa powder

matcha green tea


Heat a saucepan 1/3 full with hot water, and in a bowl set on top, melt the chocolate, stirring over the barely simmering water until smooth. Remove from heat and add the praline powder. Stir until smooth and set aside.

Set a clean bowl on top of the simmering water and melt the 65g dark chocolate and butter. Remove from heat and stir until smooth.

Add the chocolate praline and stir well. Mix in the crushed cornflakes.

Transfer the mixture to a loaf pan, and smooth out the surface gently with a spatula. Place in the fridge and cool for several hours, until set and solid.

Prepare the chocolate coating:

In a sauce pan, heat the cream and butter until the cream begins to simmer and the butter has melted. Remove from heat, add the chocolate and stir until smooth, allow to cool.

In the meanwhile line a tray with parchment paper and set aside. Remove the chocolate crunch from the fridge and release from the loaf pan. Using a sharp knife, cut the bar into fingers, cubes or irregular shaped.

Dip each piece in the chocolate and place on the tray. When all the piece have been dipped and coated in chocolate return the tray to the fridge and allow the chocolate to set.

Before serving sprinkle with cocoa powder and matcha green tea.

Thursday, 3 June 2010

Cheesecake Brownies

The Mediterranean sea water are not quiet. Its been a difficult week and a reminder to the complex reality of the region. Enough to remove any shred of optimism. This is when food becomes a form of escapism and perhaps an allegory to how things can be done with a difference.

Not a big fan of brownies, me. Nothing personal. Don’t get me wrong, if they’re there, I’ll have one, perhaps another. It is also true that sometimes a chocolate hit is all that is needed, however I cannot say that thinking of brownies keeps me up at night, as opposed to pastry that is.

Cheesecakes are a different story. They’re tricky to get right, and less forgiving to bake. Spoilt, one might even say. They’re rich, lactic and costly to make, ie high maintenance. Being a lover of all things efficient to the max, cheesecake has not managed to fall into this category.

So far, not so good.

I was pleased to find that 2 minuses (-) (-) equal a major plus (+) in the kitchen. The marriage of chocolate + cheese resulted in wonderful cheesecake brownies. Once they both agreed to leave their egos behind to create a hybrid whole bigger then the sum of its parts, that is.

The brownie base is a rich dark bitter chocolate with chunky pieces of roasted walnuts. The thin cheesecake layer does a balancing act with its creamy tang.

A finishing layer of chocolate fudge rounds it all up. Like the coating of a pill, it goes down smoothly and swiftly.

Now all that’s left to figure is, if cheesecake and brownies can find a way to get along, surely so can people?

Cheesecake Brownies

Recipe adapted from David Leibowitz

1 Brownie pan

The brownies:


85g unsalted butter, cut into pieces


115g dark chocolate (70%cocoa), coarsely chopped

2/3 cup sugar


2 large eggs, at room temperature


½ cup flour


1 Tbs unsweetened cocoa powder


1/8 Tsp salt


1 Tsp vanilla extract


½ cup walnuts, lightly roasted

The cheesecake:


200g cream cheese, at room temperature


1 large egg yolk


5 Tbs sugar


1/8 Tsp vanilla extract

The chocolate fudge coating:

100g dark chocolate (70%cocoa), coarsely chopped

1 Tbs Golden syrup

25g unsalted butter


Line the pan with foil, making sure it goes up all four sides and grease lightly.

Preheat oven to 180C°.

Make the brownies batter:

In a medium saucepan, melt the butter and chocolate over low heat, stirring until smooth. Remove from heat and beat in the 2/3 cup sugar, then the eggs.

Mix in the flour, cocoa powder and salt, then the vanilla and the roasted walnuts. Spread evenly in the prepared pan.

Make the cheesecake batter:

In a separate bowl, beat together the cream cheese, the yolk, 5 tablespoons of sugar, and vanilla until smooth.

Distribute the cream cheese mixture in eight dollops across the top of the brownie mixture, then take a dull knife or spatula and smooth the cream cheese mixture over the chocolate batter.

Bake for 20-25 minutes, or until the batter in the centre of the pan feels just set.

Let cool, then make the chocolate fudge coating.

Melt the chocolate in a bain marie (aka double boiler).

Meanwhile, heat the water to boiling in the small, heavy saucepan. When the chocolate has melted remove from the heat and add the butter and golden syrup.

Stir until smooth and allow the mixture to cool, stirring from time to time.

Spread the fudge over the cheesecake and allow it to cool.

Lift out the foil and peel it away.

Cut the brownies into squares and, unless serving right away, keep in an airtight container in the fridge.

Note: to create the pattern I used cocoa powder and a stencil bought from an arts & crafts shop.

Saturday, 27 March 2010

Salted Caramel Matzoh Crunch with Chocolate

Passover is almost here. It feels it. The weather is changing and unpredictable, the clocks have been reset for summer time and the air has a festive flair to it.

It is a time for Matzo and Matzo meal cakes, cookies, fritters and snacks. Surprisingly, few snacks are on offer during this period that are both made of matzo meal and taste good. Those wishing to enjoy a decent sweet snack tend to use other ingredients over matzo as base such as marzipan, nuts or chocolate.

I think I know why. I think its about nostalgia. Once a year, during Passover, unidentified cookies appear on supermarket shelves. They bear strange name and are manufactured by unknown companies. This happens every year. The coconut and peanut cookies taste as they did when I was growing up. They are the taste of Passover, along with the Gefilte fish, and it wouldnt be one without them.

However, be that as it may and with the utmost respect for nostalgia, I cannot put them in my mouth. They taste awful.

This is a recipe written by Marcy Goldman over 20 years ago which I found about a year ago and put a pin in it, until now. It was worth the wait.

This is an insanely indulgent confectionery without the faintest flavor of nostalgia despite the fact Matzo spread with chocolate is what the Passovers of my childhood tasted of.

It has everything one can wish for: salted butter caramel, chocolate and the option to creatively customize it to a sin of your liking. Oh, and its dead easy to make.

Happy holidays.


Caramelized Matzoh Crunch with Chocolate

Recipe adapted from here


4 to 6 sheets of matzoh


200 Salted butter, cut into chunks


1 cup (firmly-packed) light brown sugar


1 cup dark chocolate (70%cocoa), coarsely chopped

Topping of your choice,

(I used

Roasted pumpkin seeds

Cinnamon sugar )


Line a baking tray completely with foil making sure it goes up the sides. Preheat the oven to 175°C degrees.

Line the bottom of the sheet completely with matzoh, breaking extra pieces as necessary to fill in any spaces.

In a medium-sized heavy duty saucepan, combine the butter and sugar, and cook over medium heat until the butter begins to boil.

Boil for 3 minutes, stirring occasionally.

Remove from heat and pour over matzo, spreading with a heatproof utensil.

Put the baking sheet in the oven and bake for 15-20 minutes, until the syrup darkens and gets thick.

While it's baking, make sure it's not burning. If so, reduce the heat.

Remove from oven and immediately cover with chocolate chunks. Let stand 5 minutes, and then spread smooth with an offset spatula.

Now comes the fun creative part.

You can sprinkle with a mixture of seeds and nuts, I sprinkled a handful of roasted pumpkin seeds, but sunflower seeds, sesame, walnuts, hazelnuts and almonds will also work. You can add raisins or candied orange peel for a fruit & nut combo or.

Another option is to omit the dark chocolate altogether replace it with white chocolate and sprinkle with roasted coconut flakes, or simply have it with the salted caramel.

Let cool completely in the refrigerator, then break into pieces and store in an airtight container until ready to eat.